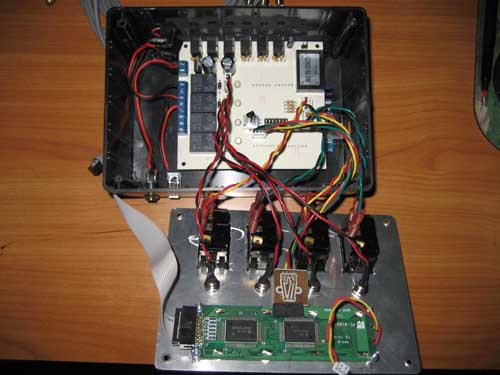
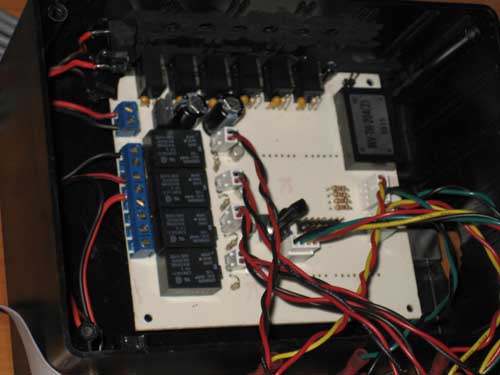
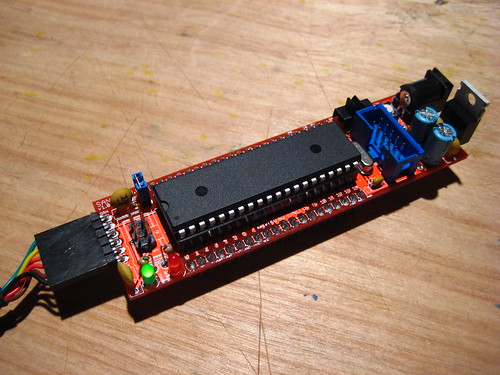
I need to make a youtube video of this, otherwise it'll be too many pictures. I still need to put it in a case, but for the brewery control part of things it's done and working. Still to do is place it in a case, finish the other temperature probes , decide how I want to log data and write the second sketch to control fermentation. Actually, I'll just add to this one and have an option to select the brewery control program or the fermentation program.
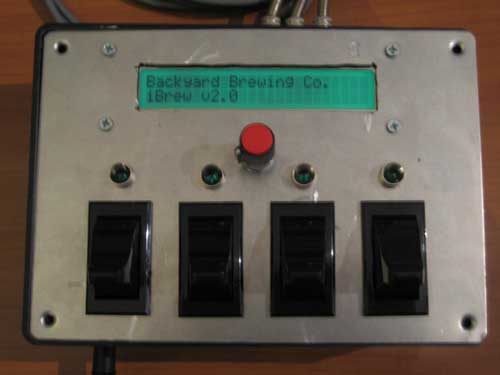
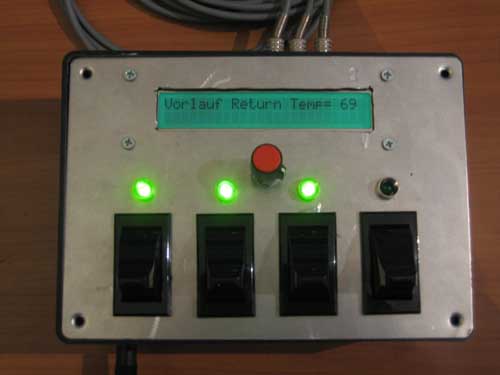
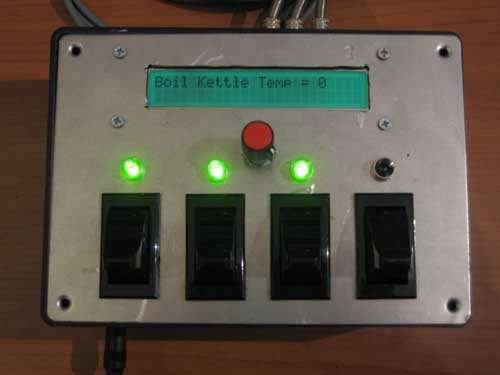
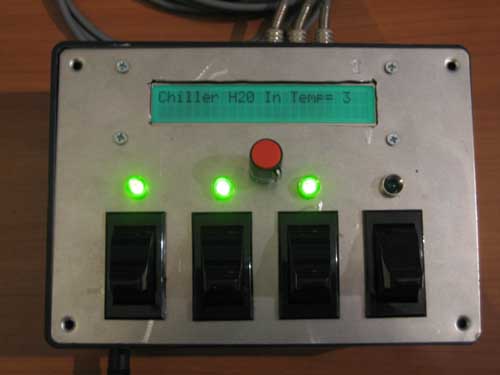
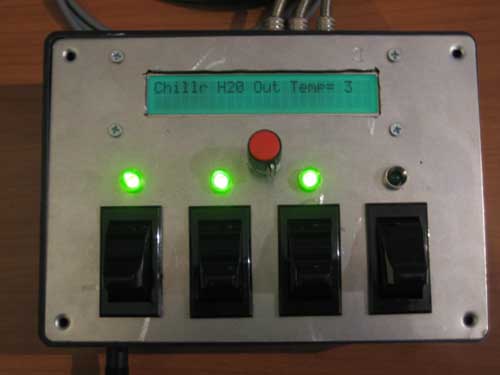
When you start it, there is a splash screen for 5 seconds, then it goes to displaying the HLT temp. There is a rotary encoder (like a potentiometer but with no ends) that has a push button selector like a car stereo or iPod. You can cycle through each of the 6 temperature displays.
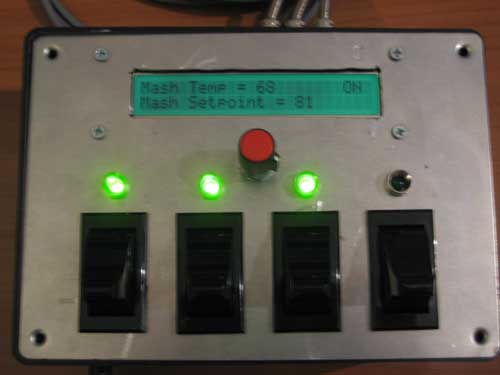
If you are on the HLT or Mash Temp displays, you can press the encoder to enter the setpoint routine and set a setpoint for either of those. It'll tell you "Setpoint Accepted" and then jump back to the temp display routine. If a setpoint has been entered, the HLT or Mash displays will display the setpoint as well as the current temp and tell you in the burner is on. There is a built-in 30 second delay on the burner ignition, so the burner cannot re-ignite within 30 seconds of having just been on. If the 30 second lock-out is active, the display has a count-down timer on it, otherwise it will display "ON" or "OFF" on the corner of the display when you are viewing HLT or MLT temps.
Here's the code so far:
Code: Select all
// **************************************************************
// ** Backyard Brewing Co.                                     **
// ** iBrew                                                    **
// ** Brewery Logging and Control System v 2.0                 **
// ** ***********************************************************

#include <LCD4Bit.h>                           //create object to control an LCD.
LCD4Bit lcd = LCD4Bit(2);                      //number of lines in display=2

#define LM34  0.48828125       // defines LM34 as .48828125 which is 500/1024 for the LM34 which produces .5mV per 1/2*F.
#define encoderPinA  2
#define encoderPinB  3
#define encoderSelector 0

// Variable Declarations
int i = 0;                                   // Used for For loop control
int selectorCount = 0;                       // holds count for encoder selector button presses
unsigned long time = 0;                      // used to take a snapshot of current runtime and hold it.
char lcdString[12];                          // temp variable for int to char conversion for LCD
volatile int encoderPos = 0;                 // Stores rotary encoder position
volatile int selectorLimit = 0;              // Holds maximum value before encoder stops counting

// Array definitions
int relayPin [4] = {10, 11, 12, 13 };        // sets relay pins on 10, 11, 12, 13
int relayStatus [4] = {0, 0, 0, 0 };
int setPoint [2] = {0, 0 };
unsigned long offTime [2] = {0, 0 };
boolean relayDelayOn [4];

/*
Relay pin array position Relay:
0 = HLT Relay
1 = MLT Relay
*/

// Sensor Read definitions
int sensorPin [6] = {0, 1, 2, 3, 4, 5 };                  // defines analog pins temp sensors are on
float tempReading [6] = {0.0, 0.0, 0.0, 0.0, 0.0, 0.0 };  // array to store temp readings, sets all to 0
/*
TempReadings array positions:
0 = HLT Temp
1 = MLT Main body Temp
2 = MLT Sparge/recirc return temp
3 = Boil Kettle Temp
4 = Chiller H20 inlet temp
5 = Chiller H20 Outlet temp
*/


void setup() {
  lcd.init();
  //Serial.begin (9600);
  pinMode(encoderPinA, INPUT);
  digitalWrite(encoderPinA, HIGH);                           // turn on pullup resistor
  pinMode(encoderPinB, INPUT);
  digitalWrite(encoderPinB, HIGH);                           // turn on pullup resistor
  pinMode(encoderSelector, INPUT);
  digitalWrite(encoderSelector, HIGH);                       // turn on pullup resistor
  attachInterrupt(0, doEncoder, CHANGE);                     // encoder pin on interrupt 0 - pin 2
  lcd.clear();                                               // clears LCD screen
  lcd.printIn("Backyard Brewing Co.");
  lcd.cursorTo(2, 0);
  lcd.printIn("iBrew v2.0");
  for ( i = 0; i < 4; i ++) {                                // Set Digital Pin modes and turn all relays off
    pinMode(relayPin [i], OUTPUT);
    digitalWrite(relayPin [i], LOW);
    }
  delay (5000);                                              // Hold splash screen for 5 seconds
}                                                            // end setup

void loop(){                                                 // Begin Program loop

for ( i = 0; i < 6; i++) {                                   // Read all sensors
  tempReading [i] = (analogRead(sensorPin [i]) * LM34);      // Reads each analog pin, converts the reading to *F and stores it in the TempReading array
  }

selectorLimit = 5;                                          // Sets top limit on encoder to 5
switch (encoderPos) {                                       // selects display based on encoder position
  case 0 :
    if (digitalRead (encoderSelector) == LOW ) {            // In the selector is pressed, accept new setpoint
      selectorLimit = 212;                                  // Set encoder top limit to 212
      encoderPos = setPoint[0];                             // starts encoder position at current setpoint
      delay (300);                                          // debounce selector
      while (digitalRead (encoderSelector) == HIGH) {       // while the selector is NOT pressed, accept new setpoint from encoder
        lcd.cursorTo(1, 0);                                 // Places LCD cursor to line 1 pos 0
        lcd.printIn("Enter HLT Setpoint : ");
        lcd.printIn(itoa(encoderPos, lcdString, 10));       // converts integer to char for LCD print
        lcd.printIn("         ");                           // print empty space to blank LCD without refreshing it
        lcd.cursorTo(2, 0);
        lcd.printIn("Current Setpoint = ");
        lcd.printIn(itoa(setPoint[0], lcdString, 10));
        lcd.printIn("          ");
        }
        setPoint[0] = encoderPos;                           // Sets new setpoint to encoder position
        lcd.clear();                                        // clear LCD
        lcd.printIn("New Setpoint Accepted");
        encoderPos = 0;                                     // clear encoder position
        delay (1000);                                       // wait 1 second to read message
        break;                                              // return to program
    }
    else {
    lcd.cursorTo(1, 0);                                     // if selector has not been pressed, display as normal
    lcd.printIn("HLT Temp = ");
    lcd.printIn(itoa(tempReading[0], lcdString, 10));
    lcd.printIn("       ");
    if (relayStatus[0] == 1)  {                                        // Check if relay is on or off
      if (relayDelayOn [0])  {                                          // Check delay status
        lcd.cursorTo(1,21);
        lcd.printIn(itoa(30-(time - offTime [0]), lcdString, 10));      // If delay is on, display count down timer
        lcd.printIn(" ");
      }
      else  {                                                           // delay is not on, display "ON"
        lcd.cursorTo(1, 21);
        lcd.printIn("ON ");
      }
    }
    if (relayStatus[0] == 0)  {                                          // relay is flagged as off
      lcd.cursorTo(1, 21);
      lcd.printIn("OFF");                                                // display "OFF"
    }
    lcd.cursorTo(2, 0);
    lcd.printIn("HLT Setpoint = ");
    lcd.printIn(itoa(setPoint[0], lcdString, 10));
    lcd.printIn("           ");
    break;
    }

  case 1 :                                                  // All other cases are based on case 0
    if (digitalRead (encoderSelector) == LOW ) {
      selectorLimit = 212;
      encoderPos = setPoint[1];
      delay (300);
      while (digitalRead (encoderSelector) == HIGH) {
        lcd.cursorTo(1, 0);
        lcd.printIn("Enter Mash Setpoint: ");
        lcd.printIn(itoa(encoderPos, lcdString, 10));
        lcd.printIn("         ");
        lcd.cursorTo(2, 0);
        lcd.printIn("Current Setpoint = ");
        lcd.printIn(itoa(setPoint[1], lcdString, 10));
        lcd.printIn("          ");
        }
        setPoint[1] = encoderPos;
        lcd.clear();
        lcd.printIn("New Setpoint Accepted");
        encoderPos = 1;
        delay (1000);
        break;
    }
    else {
    lcd.cursorTo(1, 0);
    lcd.printIn("Mash Temp = ");
    lcd.printIn(itoa(tempReading[1], lcdString, 10));
   lcd.printIn("      ");
    if (relayStatus[1] == 1)  {
      if (relayDelayOn [1])  {
        lcd.cursorTo(1,21);
        lcd.printIn(itoa(30-(time - offTime [1]), lcdString, 10));
        lcd.printIn(" ");
      }
      else  {
        lcd.cursorTo(1, 21);
        lcd.printIn("ON ");
      }
    }
    if (relayStatus[1] == 0)  {
      lcd.cursorTo(1, 21);
      lcd.printIn("OFF");
    }
    lcd.cursorTo(2, 0);
    lcd.printIn("Mash Setpoint = ");
    lcd.printIn(itoa(setPoint[1], lcdString, 10));
    lcd.printIn("             ");
    break;
    }

  case 2 :
    lcd.cursorTo(1, 0);
    lcd.printIn("Vorlauf Return Temp= ");
    lcd.printIn(itoa(tempReading[2], lcdString, 10));
    lcd.printIn("      ");
    lcd.cursorTo(2, 0);
    lcd.printIn("                          ");
    break;

  case 3 :
    lcd.cursorTo(1, 0);
    lcd.printIn("Boil Kettle Temp = ");
    lcd.printIn(itoa(tempReading[3], lcdString, 10));
    lcd.printIn("      ");
    lcd.cursorTo(2, 0);
    lcd.printIn("                          ");
    break;

  case 4 :
    lcd.cursorTo(1, 0);
    lcd.printIn("Chiller H20 In Temp= ");
    lcd.printIn(itoa(tempReading[4], lcdString, 10));
    lcd.printIn("      ");
    lcd.cursorTo(2, 0);
    lcd.printIn("                          ");
    break;

  case 5 :
    lcd.cursorTo(1, 0);
    lcd.printIn("Chillr H20 Out Temp= ");
    lcd.printIn(itoa(tempReading[5], lcdString, 10));
    lcd.printIn("      ");
    lcd.cursorTo(2, 0);
    lcd.printIn("                          ");
    break;
  }


//  Compare sensor reads to setpoints and set relays accordingly
//  HLT Control
time = millis() / 1000;                                 // Sets time to the current total program runtime in seconds.
if (tempReading [0] < setPoint [0] ) {                  // Compare HLT temp: Temperature is below setpoint
  if ( time - offTime [0] > 30)  {                      // Check to confirm burner has been off at least 30 seconds
    digitalWrite( relayPin [0], HIGH);                  // Turn HLT Burner On.
    relayStatus [0] = 1;                                // Set HLT Burner Status as on
    relayDelayOn [0] = false;                           // Set burner delay flag as off
  }
  else {                                                // 30 second delay is not over
    relayStatus [0] = 1;                                // Flag the relay as on (even though it isn't)
    relayDelayOn [0] = true;                            // Flag the relay delay as true
  }
  }
else  {                                                 // Temperature is above setpoint
  if (relayStatus[0] == 1)  {                           // Confirm relay is currently on
    digitalWrite( relayPin [0], LOW);                   // Turn HLT Burner Off.
    relayStatus [0] = 0;                                // Set HLT Burner Status to off
    offTime [0] = time;                                 // Time stamps the off time for Burner.
  }
}
// End HLT Control

// MLT Control
time = millis() / 1000;                                 // Sets Time to the current total program runtime in seconds.
if (tempReading [1] < setPoint [1] ) {                  // Compare MLT: Temperature below setpoint
  if ( time - offTime [1] > 30)  {                      // Check to confirm burner has been off at least 30 seconds
    digitalWrite( relayPin [1], HIGH);                  // Turn MLT Burner On.
    digitalWrite( relayPin [2], HIGH);                  // Turn Pump On to ensure wort is not scortched
    relayStatus [1] = 1;                                // Set MLT Burner Status as on
    relayStatus [2] = 1;                                // Set MLT Pump Status as on
    relayDelayOn [1] = false;                           // Set relay 2 delay as false
    relayDelayOn [2] = false;                           // Set relay 3 delay as false
  }
  else {                                                // 30 second delay is not over
    relayStatus [1] = 1;                                // Flag MLT burner as on
    relayStatus [2] = 1;                                // Flag pump as on
    relayDelayOn [1] = true;                            // Flag MLT burner delay as true
    relayDelayOn [2] = true;                            // Flag pump delay as true
  }
  }
else  {                                                 // Temperature is above setpoint
  if (relayStatus[1] == 1)  {                           // Confirm relay is on
    digitalWrite( relayPin [1], LOW);                   // Turn HLT Burner Off.
    digitalWrite( relayPin [2], LOW);                   // Turn pump off.
    relayStatus [1] = 0;                                // Set HLT Burner Status
    relayStatus [2] = 0;                                // Set relay 3 pump status
    offTime [1] = time;                                 // Time stamps the off time for Burner.
  }
}
// End MLT control


}                                            // End Program loop


void doEncoder(){                           // encoder routine.  modified from Arduino.cc Playground.
  if (digitalRead(encoderPinA) == HIGH) {   // found a low-to-high on channel A
    if (digitalRead(encoderPinB) == LOW) {  // check channel B to see which way encoder is turning
      encoderPos ++ ;          // CW
    }
    else {
      encoderPos -- ;          // CCW
    }
  }
  else {                                     // found a high-to-low on channel A
    if (digitalRead(encoderPinB) == LOW) {   // check channel B to see which way encoder is turning
      encoderPos --;            // CCW
    }
    else {
      encoderPos ++;            // CW
     }
  }

  if ( encoderPos <=0 ) {                    // set lower limit of encoder to 0
        encoderPos = 0;
      }
  if ( encoderPos >= selectorLimit ) {        // set upper limit of encoder to set limit
        encoderPos = selectorLimit;
        }
 //Serial.println (encoderPos, DEC);           // debug - remember to comment out
}


 Become a Brewer's Hardware Fan on Facebook!